

Prerequisites:
Basic knowledge of how to use the Soarvo mobile application.
Basic knowledge of how to use the Soarvo web portal and setup feature types.
App Version:
0.0.206+
As of writing this article, 20/May/2026, this build is only available in the Play Store beta channel and iOS TestFlight
When photos are taken or imported in the Soarvo app they are watermarked with a set of default data (current date and time, easting (x) and northing (y) of your current position in the current projects projection, the user name, and altitude). This can be customized to instead use specific data and the value of attributes in the feature.
To enable this you must create an attribute, in the feature type you want to customize the watermarking, with a attribute name of ‘_PHOTO_WATERMARK_ATTRIBUTES‘. The value in the ‘Attribute Settings’ needs to be a comma separated value (CSV) of what data you want to use for watermarking. Typically this is just the name (which is case sensitive) of the attributes you want to use – but there is a list of specific codes summarized in the below table that you can also use.
These watermark codes can be added to _PHOTO_WATERMARK_ATTRIBUTES as a comma-separated list. The app then builds the watermark text from each code in the order provided.
| Code | Description | Example watermark output |
|---|---|---|
_ID |
Adds the current feature ID. | ID: MH-1024 |
_FEATURETYPENAME |
Adds the current feature type name. | Feature Type: Manhole |
_TIMESTAMP |
Adds the current date/time using the app’s standard formatted timestamp. | Date: 20/May/2026 14:37:11 |
_DATE |
Adds the current date using the app’s standard formatted date. | Date: 20/May/2026 |
_CURRLATLNG |
Adds the device’s current latitude and longitude. | Lat: 53.3498050, Lng: -6.2603100 |
_CURRLATLNGALT |
Adds the device’s current latitude, longitude, and altitude. | Lat: 53.3498050, Lng: -6.2603100 |
_CURRXY |
Adds the device’s current position transformed into the configured watermark EPSG coordinate system. For EPSG codes 27700, 29902, 29903, and 2157 the labels are E and N. For other EPSG codes the labels are X and Y. |
E: 315624.442, N: 234118.901 |
_CURRXYZ |
Adds the device’s current projected coordinates plus elevation as Z. |
E: 315624.442, N: 234118.901 |
_FEARTUREXY |
Adds the feature anchor position transformed into the configured watermark EPSG coordinate system. The output keys are prefixed with Feature. |
Feature E: 315620.005, Feature N: 234122.771 |
_FEATUREXYZ |
Adds the feature anchor position in projected coordinates plus elevation as Z. The output keys are prefixed with Feature. |
Feature E: 315620.005, Feature N: 234122.771 |
_FEARTURELATLNG |
Adds the feature anchor position as latitude and longitude. The output keys are prefixed with Feature. |
Feature Lat: 53.3497100, Feature Lng: -6.2601200 |
_FEARTURELATLNGALT |
Adds the feature anchor position as latitude, longitude, and altitude. The output keys are prefixed with Feature. |
Feature Lat: 53.3497100, Feature Lng: -6.2601200 |
[attribute name] |
Replace ‘[attribute name]’ with the actual attributes name. If a watermark code matches an attribute name on the feature type, the watermark will use that attribute’s display value. | ASSET_TAG: SW-4481 |
Below is a screenshot of how the ‘_PHOTO_WATERMARK_ATTRIBUTES’ might look setup in a feature type.
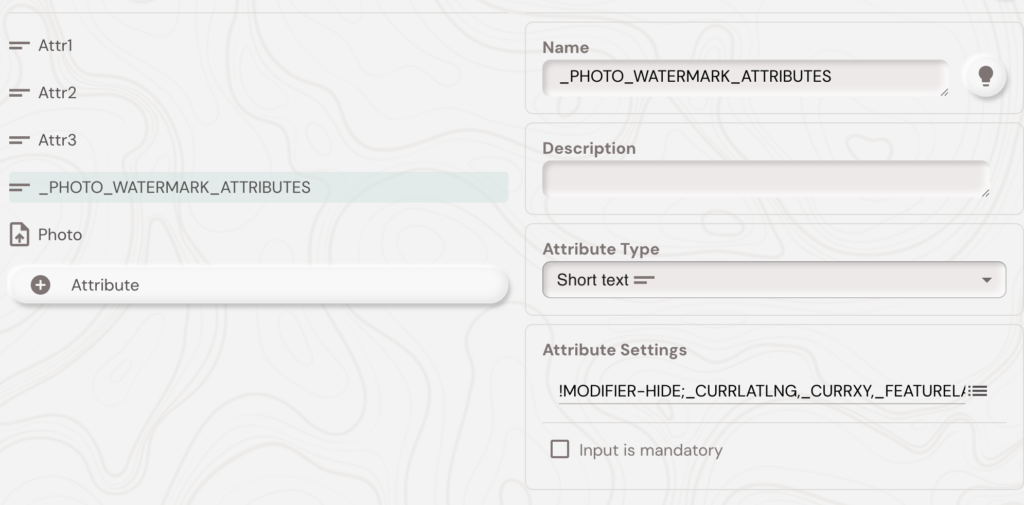
the ‘Attribute Settings’ value is ‘!MODIFIER-HIDE;_CURRLATLNG,_CURRXY,_FEATURELATLNG,_FEATUREXY,_FEATUREXYZ,Attr1,Attr2,Attr3’. Which is telling the app to hide this attribute from displaying, and then any of the keys beginning with an underscore will use the above tables values. Then it will just use the value of the ‘Attr1’, ‘Attr2’, ‘Attr3’ attributes directly.
Once the above is done, any features created of the feature type with the ‘_PHOTO_WATERMARK_ATTRIBUTES’ attribute will use that for creating the watermark on all photos for that feature. The layout is a two columns, and it will attempt to fit two parts of the data on one line. If the data is too long it will be placed onto its own line. This is shown in the video below.